Monday, November 21, 2005
Lesson 1: Welcome
Hi!
This tutorial will try to help you to achieve the learning objectives of this infoRAD:
This tutorial will try to help you to achieve the learning objectives of this infoRAD:
- Explain how to use free and popular internet software to create and maintain web pages with radiological content.
- Review our experience with the teaching file site RAD FILES (www.radfiles.blogspot.com)
Just scroll down to proceed with the lessons.
# posted by lmt @ 8:10 AM

Lesson 2: Introduction
Creating web pages with radiological content is a time consuming and a technicaly demanding task, but is an excellent way to share knowledge.
An excellent article by Anthony G. Ryan, Luck J. Louis, and William C. Yee
HTML and Web Site Design for the Radiologist: A Primer
explain how to construct a basic Web page, with notions of HTML (hypertext markup language) and instructions to introduce interactivity, link to other Web sites, and upload the finished product to the World Wide Web.
RadioGraphics 2005 25: 1101-1118
But as they noticed, there are many "packages" that can easily and almost automaticaly help you building web pages with no need of profound technical knowledge, in a painless way.
One is the "blogging" concept.
# posted by lmt @ 8:05 AM
Lesson 3: What´s a Blog?
 Well, a blog is a web page.
And, like any web page, it can be whatever you want, imagination is the limit.
A Blog is a free, easy-to-use web site, where we can quickly post thoughts, interact with people, and create all kinds of web pages.
And guess what... even this tutorial is a blog!
There are a lot of places (websites) where you can create your blog, most of them for free.
The first one and most popular is Blogger (www.blogger.com)
# posted by lmt @ 8:00 AM
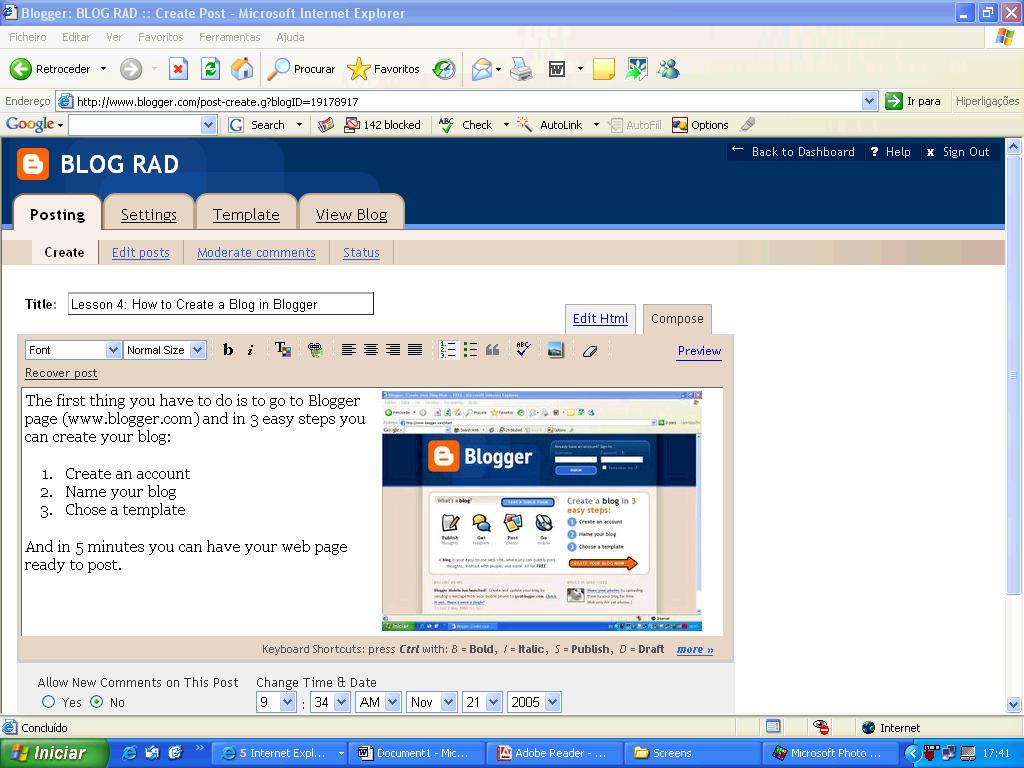
Lesson 4: How to Create a Blog in Blogger
 The first thing you have to do is to go to the Blogger page (www.blogger.com), and in 3 easy steps you can create your own blog:
- Create an account
- Name your blog
- Choose a template
And in 5 minutes you can have your web page/blog ready to post.
# posted by lmt @ 7:55 AM
Lesson 5: How do I use my Blog?
 After creating a blog, you will get a username and a password to enter a dashboard and then access an intuitive interface to manage your blog.
With this interface you can:
- Post (upload your text or images and edit the previous posts)
- Change your settings (like the name of the blog, description, number of days or posts in the main page, the archive system, etc)
- Change the template (where you can pick a new template for your blog or with some html knowledge you can edit the blog code and add counters, links, banners and even google adsense and make some money).
Well, I assure you that it’s easier to use than to explain!
# posted by lmt @ 7:50 AM
Lesson 6: How can I post Photos in my Blog?
 When we sent the abstract to RSNA it was not possible to upload photos directly from the blog interface. But guess what... today you just have to click one button and you can put photos directly into your blog!
When it was not possible we had to use tools that you can freely download to manage and upload photos to blogs.
There are many programs to do that, one of the most popular is Picasa (www.picasa.com) and if you want you can continue using it.
Just go to the web page, register, download, and start using it!
# posted by lmt @ 7:45 AM
Lesson 7: What kind of Rad Blog can I create?
 You can create as many different blogs with radiological content as your imagination allows you to, like any kind of web pages.
But remember that you are responsible for the blog and must be careful, namely with the possibility of litigation.
In December 2004 we start a blog named RADFILES in order to post online radiological files.
# posted by lmt @ 7:40 AM
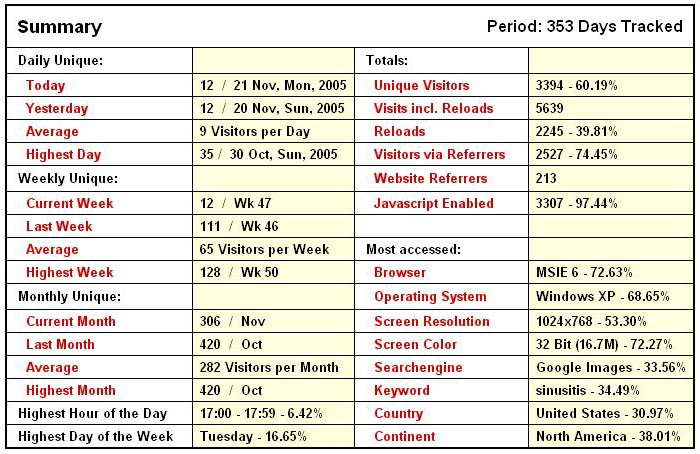
Lesson 8: Experience with RAD FILES
Although we have only posted 14 cases in less than one year we have had more than 5000 page views from 84 countries.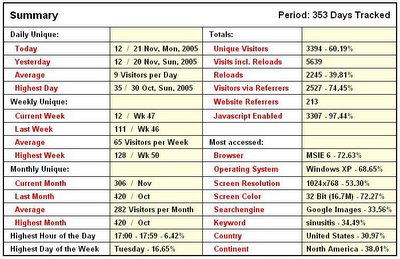
# posted by lmt @ 7:35 AM
Lesson 9: Conclusion
With this infoRad tutorial you have learned a way to use free and popular internet software to create and maintain web pages with radiological content and review our experience with the teaching file site RAD FILES.
Note that this presentation is itself a blog and is on the internet. Just take note of the address (www.blograd.blogspot.com) and you can return whenever you want from any computer to repeat the tutorial and even call your friends that stay at office to view it.
Thanks for your attention!
To visit RAD FILES: www.radfiles.blogspot.com
To create your blog: www.blogger.com (Don’t forget to send us an e-mail with the address)
# posted by lmt @ 7:30 AM
![]()

